After resolving errors in your schemas, you can migrate the schemas to an EDB Postgres Advanced Server database.
The Migration Portal provides guided steps for migrating your schemas using one of the following target database options:
- Offline migration - download a data definition language (DDL) SQL file to create the schema manually in a target EDB Postgres Advanced Server database using a client application such as the psql client or pgAdmin. This option is suitable for both on-premises and cloud based migrations.
- Online migration - connect directly to a target EDB Postgres Advanced Server database and automatically create the schema in it. Generally, this option is most suitable for migrations to databases running in the cloud (either BigAnimal clusters or self-managed instances).
Note
To preserve the Oracle object ownership in the target database, you must choose the Offline migration option. See Import the schema into your target database.
Before migrating a schema, EDB recommends that you identify any configuration requirements for the target database in Known issues, limitations, and notes.
Offline migration
Migrate schemas manually to an EDB Postgres Advanced Server on Windows or Linux platforms by running a DDL SQL file using a client.
Download the SQL files
In the Projects view, select Migrate to....
Select Offline Migration and Next.
Select one or more schemas to migrate to EDB Postgres Advanced Server. You can also expand a schema and select specific object types under each schema.
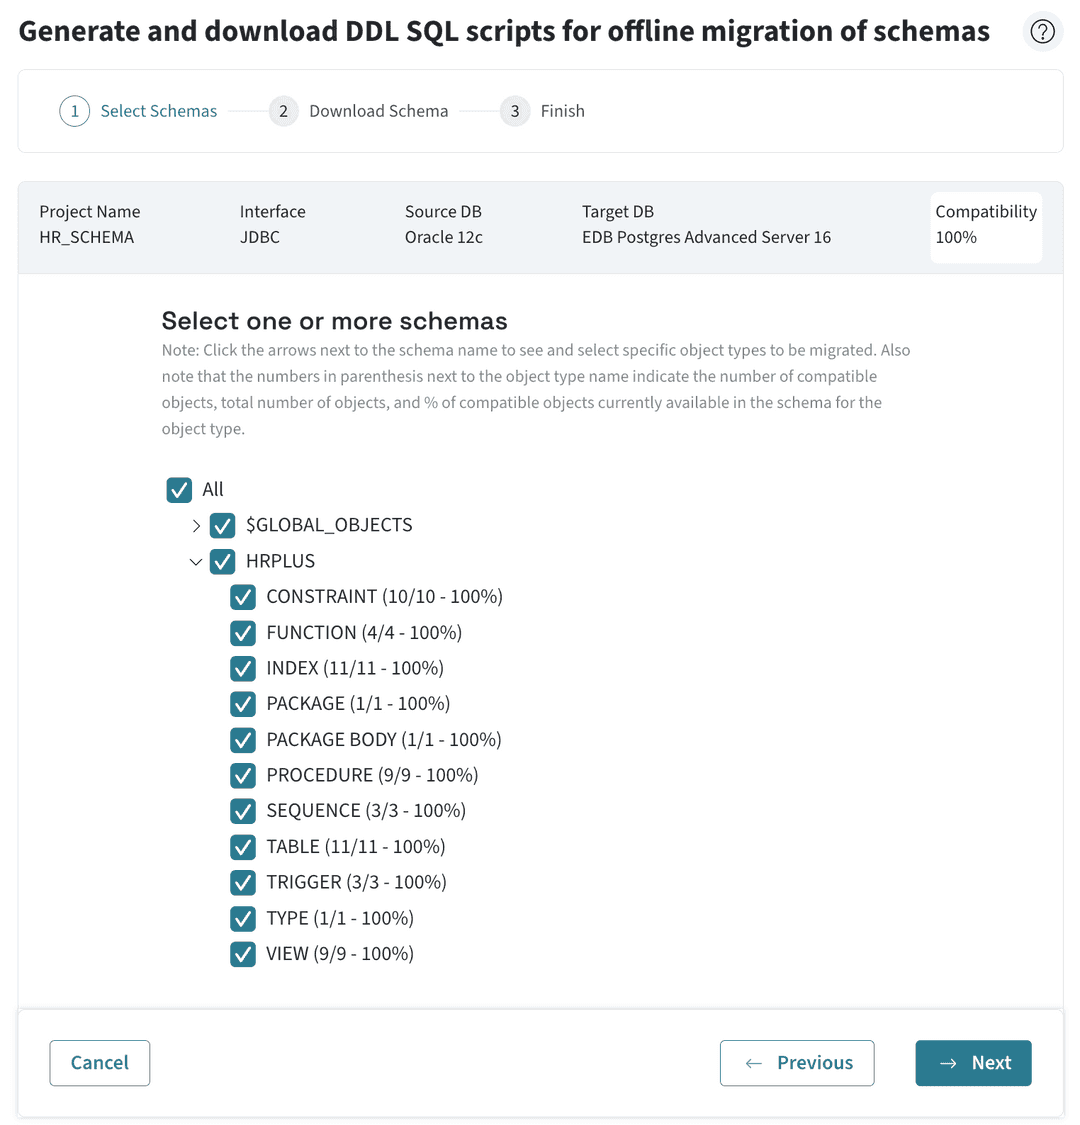
Note
If your schemas aren't 100% compatible, a banner appears. Complete the Contact Us form as needed.
Select Download SQL file, to download the assessed schema. The zip package consists of SQL files with DDLs for your selected schemas and objects. The DDLs are grouped in SQL files by project, schemas, or objects.
File name Description Example <ProjectName>_ALL_OBJECTS.sqlA single consolidated file consisting of DDLs for all your selected schemas and objects. AllTestMigration_ALL_OBJECTS.sqlconsists of DDLs for all objects of schemas OE, SH, IX, and PM, and only selected objects of schema HR.<SchemaName>.sqlOne or more files, each consisting of DDLs for selected objects in a particular schema. HR.sqlconsists of DDLs for all the selected objects of the HR schema.$GLOBAL_OBJECTS.sqlA single file consisting of DDLs for the schemas, roles, users, and their grants. Used when you preserve Oracle object ownership. <SchemaName>_<ObjectType>.sqlOne or more files, each consisting of DDLs for a single selected object. HR_TABLE.sqlconsists of DDLs only for TABLE object of the HR schema.After the zip file finishes downloading, select Done to return to the main Migration Portal page.
Import the schema into your target database
After you download the SQL files, import the schema into your target database. The way you import the schema determines who owns the imported objects.
In Oracle, a user and a schema are the same thing. Objects in the HR schema are always owned by the HR user. In EDB Postgres Advanced Server, as in Postgres, a user and a schema are separate, and the owner of an object is the user that creates it. If you run the <ProjectName>_ALL_OBJECTS.sql file as a superuser (for example, enterprisedb), the superuser owns every imported object. Other users can then access the objects only if you provide access using GRANT statements.
Choose one of the following options:
- Import as a superuser is the simplest option. Use it if your application connects as the superuser or as the owner of the objects, or if you plan to provide access using
GRANTstatements. - Preserve Oracle object ownership is the option to use if your application logs in as the schema user (such as
HR) and you want the same owners as in Oracle. Without the same owners, the schema user getspermission deniederrors, even on its own schema.
Select the tab for the option you want to use:
Run the SQL files, such as the <ProjectName>_ALL_OBJECTS.sql file, as a superuser. The superuser owns all the imported objects.
Extract the downloaded zip file.
Use the
psqlcommand line utility (also available asedb-psqlin an EDB Postgres Advanced Server installation) to connect to your EDB Postgres Advanced Server database server as a superuser, such asenterprisedb.Create a new database. Replace
<target_db>with the name of the new database:CREATE DATABASE <target_db>;
Connect to the new database:
\connect <target_db>
Import the required SQL files into the new database:
\i <path_to_exported_schema_file>.sql
Note
You can alternatively use the pgAdmin client for the import.
To keep the Oracle ownership, use the $GLOBAL_OBJECTS.sql file and the individual schema files (for example, HR.sql and SALES.sql) from the downloaded zip file instead of the <ProjectName>_ALL_OBJECTS.sql file.
Use the psql client for this procedure. Some errors are expected, and psql continues past them. The pgAdmin Query Tool stops the whole script at the first error.
Extract the zip file. Extract the downloaded zip file. Run the commands that use the SQL files from the folder that contains the extracted files.
Connect to the server. Use the
psqlcommand line utility (also available asedb-psqlin an EDB Postgres Advanced Server installation) to connect to your EDB Postgres Advanced Server database server as a superuser, such asenterprisedb.Create the target database. Create a new database. Replace
<target_db>with the name of the new database:CREATE DATABASE <target_db>;
Then exit psql (
\q).Create the roles and users. From your operating system shell, not the psql prompt, run the
$GLOBAL_OBJECTS.sqlfile. Enclose the file name in single quotes so that the shell doesn't interpret the$:psql -U enterprisedb -d <target_db> -f '$GLOBAL_OBJECTS.sql'
The roles and users are created, but you can expect errors. The file also contains
GRANTstatements for objects that don't exist yet, so psql reports errors such asrelation ... does not existfor those statements. You can ignore these errors for now. The next steps create the objects, and a later step runs this file again to apply the grants. For the list of expected errors, see Errors you can ignore.Assign each schema to its owner. From your operating system shell, connect to the target database as a superuser:
psql -U enterprisedb -d <target_db>
At the psql prompt, create each schema and make the matching user its owner. Run one line for each schema. In the examples,
<hr>and<sales>are placeholders for the schemas and the users that own them. Replace them with the names of your own schemas and users:CREATE SCHEMA IF NOT EXISTS <hr>; ALTER SCHEMA <hr> OWNER TO <hr>; CREATE SCHEMA IF NOT EXISTS <sales>; ALTER SCHEMA <sales> OWNER TO <sales>;
If objects in one schema use objects in another schema (for example, in views, foreign keys, or code that references
<hr>.<object>from<sales>), also grantUSAGEon the schemas. In Oracle, an object grant is enough to use an object in another schema. In EDB Postgres Advanced Server, the user also needsUSAGEon the schema that contains the object.GRANT USAGE ON SCHEMA <hr> TO <sales>; GRANT USAGE ON SCHEMA <sales> TO <hr>;
Create the objects of each schema as its owner. Use the per-schema SQL files from the zip file you downloaded (the
<SchemaName>.sqlfiles, such asHR.sqlandSALES.sql). Exit psql (\q). From your operating system shell, run one command for each file:PGOPTIONS="-c role=<hr>" psql -U enterprisedb -d <target_db> -f HR.sql PGOPTIONS="-c role=<sales>" psql -U enterprisedb -d <target_db> -f SALES.sql
Setting
role=<hr>makes the superuser act as the<hr>user, so<hr>owns every object that the file creates. You don't need the password of the<hr>user.Apply the object grants. Run the
$GLOBAL_OBJECTS.sqlfile again:psql -U enterprisedb -d <target_db> -f '$GLOBAL_OBJECTS.sql'
The objects now exist, so the object grants succeed. Errors for roles and schemas that already exist are expected.
Re-create the objects that failed. Run the per-schema SQL files again, using the same commands as in Create the objects of each schema as its owner, but only for the files that reported errors the first time. Some objects depend on objects in other schemas that didn't exist yet, so they failed the first time and can be created now.
Errors you can ignore
Some errors are expected while you run the procedure. The following table lists the errors you can ignore, the step where each one occurs, and why.
| Step | Error | Reason |
|---|---|---|
| Create the roles and users, Create the objects of each schema | operator too long at or near "####..." | The file includes a header banner. This is a known export issue. |
| Create the roles and users | relation/schema/function ... does not exist on a GRANT statement | The objects don't exist yet. The Apply the object grants step creates the grants after the objects exist. |
| Create the objects of each schema | permission denied for database <target_db> on the CREATE SCHEMA line | The schema already exists because you created it in the Assign each schema to its owner step. |
| Create the objects of each schema | relation ... does not exist or permission denied for table/schema ... | The statement depends on an object that is created later. The Re-create the objects that failed step creates it. |
| Apply the object grants | schema/role ... already exists | The Create the roles and users step already created the schema or role. |
| Re-create the objects that failed | relation/constraint ... already exists or multiple primary keys ... not allowed | The Create the objects of each schema step already created the object. |
After you re-create the objects that failed, investigate any error that isn't listed in the table.
Verify object ownership
At a psql prompt connected to <target_db>, run the following query, replacing the schema names in the IN list with your own. If every object has the correct owner, the query returns no rows:
SELECT n.nspname AS schema, c.relname AS object, pg_get_userbyid(c.relowner) AS owner
FROM pg_class c
JOIN pg_namespace n ON n.oid = c.relnamespace
WHERE n.nspname IN ('<hr>', '<sales>')
  AND c.relkind IN ('r', 'p', 'v', 'm', 'S')
  AND pg_get_userbyid(c.relowner) <> n.nspname;
Note
Objects that require superuser privileges, such as public synonyms, database links, and extensions, can fail when you create the objects of each schema as its owner. Run those statements as a superuser.
Online migration
Directly connect to and create schemas in the target EDB Postgres Advanced Server database.
In the Projects view, select Migrate to....
Select Online Migration and Next.
Select one or more schemas to migrate to EDB Postgres Advanced Server. You can also expand a schema and select specific object types under each schema.
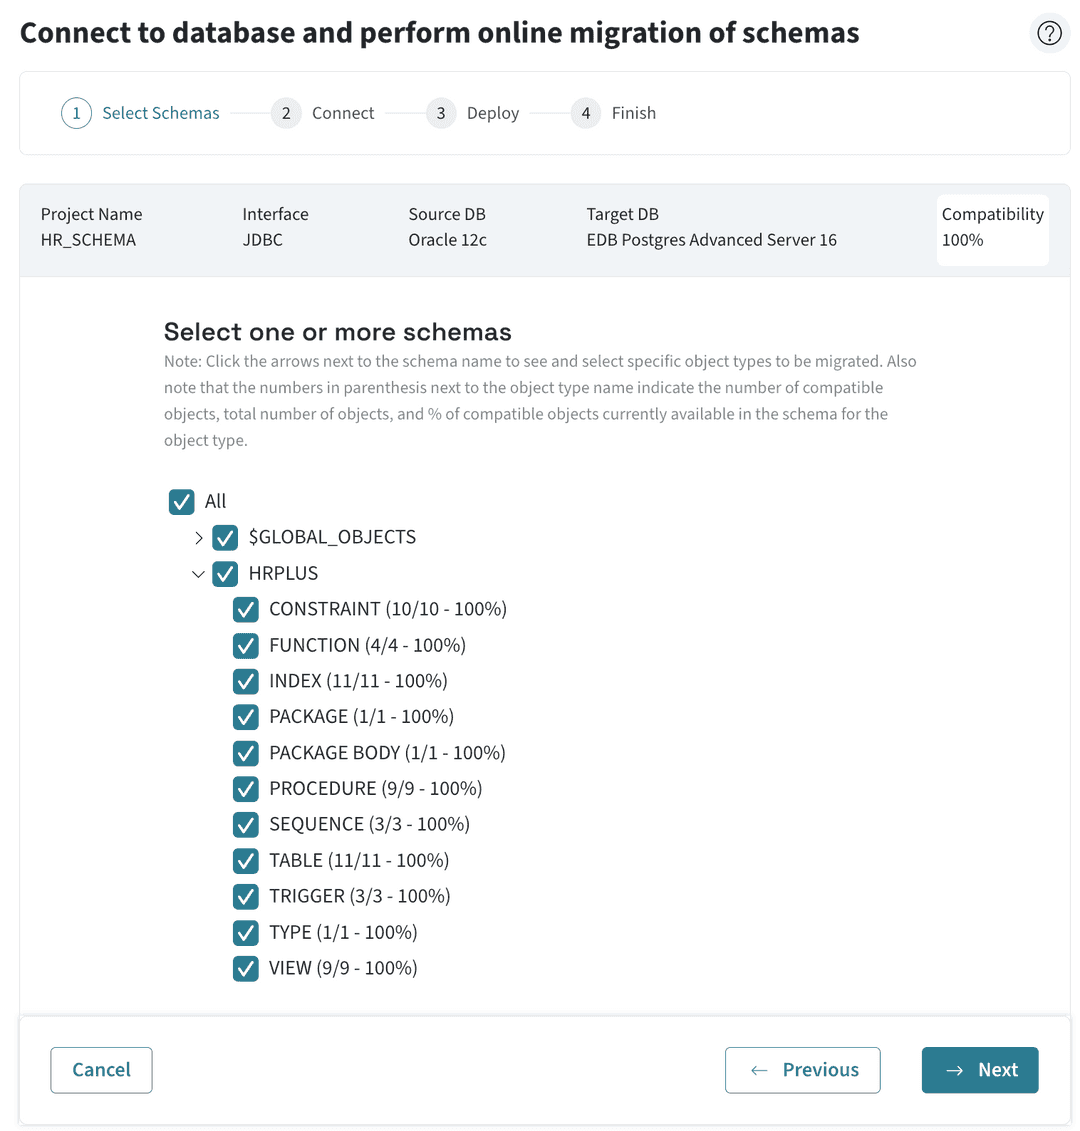
Enter the required connection details on the
Connectionpage.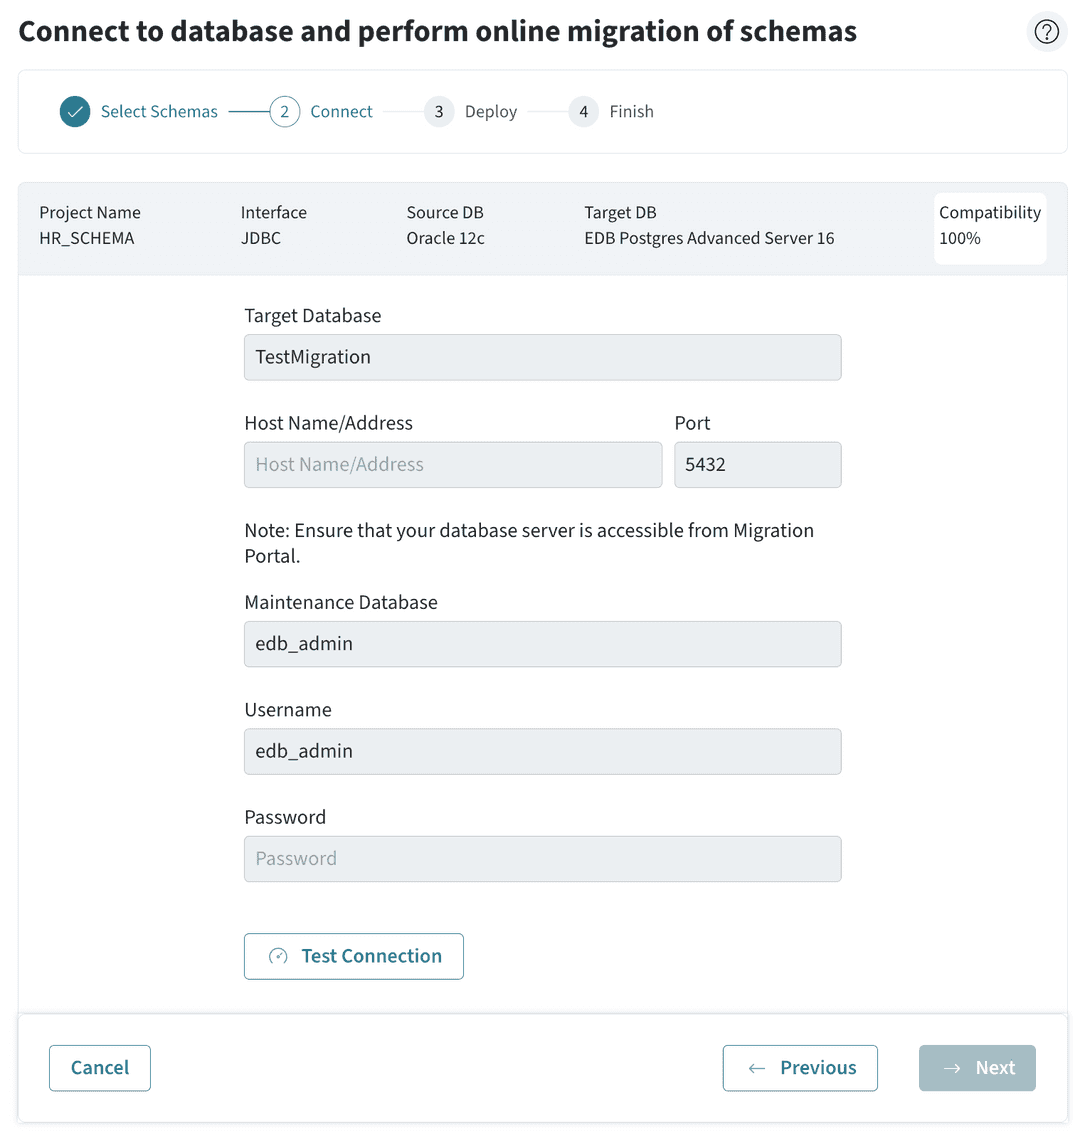
Distributed high-availability and advanced high-availability PGD destinations
When using the Migration Portal online migration option to migrate schemas into an EDB Postgres Advanced Server database, ensure the migrated schemas are created in the primary PGD database that will be replicated across the cluster.
HM-managed destinations: If the destination is an HM-managed distributed high-availability or advanced high-availability database cluster running EDB Postgres Advanced Server, both the Target Database and Maintenance Database fields must point at the default
bdrdbdatabase.On-premises database server destinations: If the destination is a PGD cluster running EDB Postgres Advanced Server, both the Target Database and Maintenance Database fields must point at the primary PGD database that will be replicated across the cluster.
To verify the connection details, select Test Connection.
Note
You can select Edit Connection to make changes to the connection details and retest the connection details.
If the test connection is successful, select Next to connect to the target database and create the selected schemas in the target server.
After the migration completes, a page displays with a message indicating whether the migration completed successfully or with errors. Select the Download Summary button to download and review a log generated for the migration attempt.
Select Done to return to the main Migration Portal page.